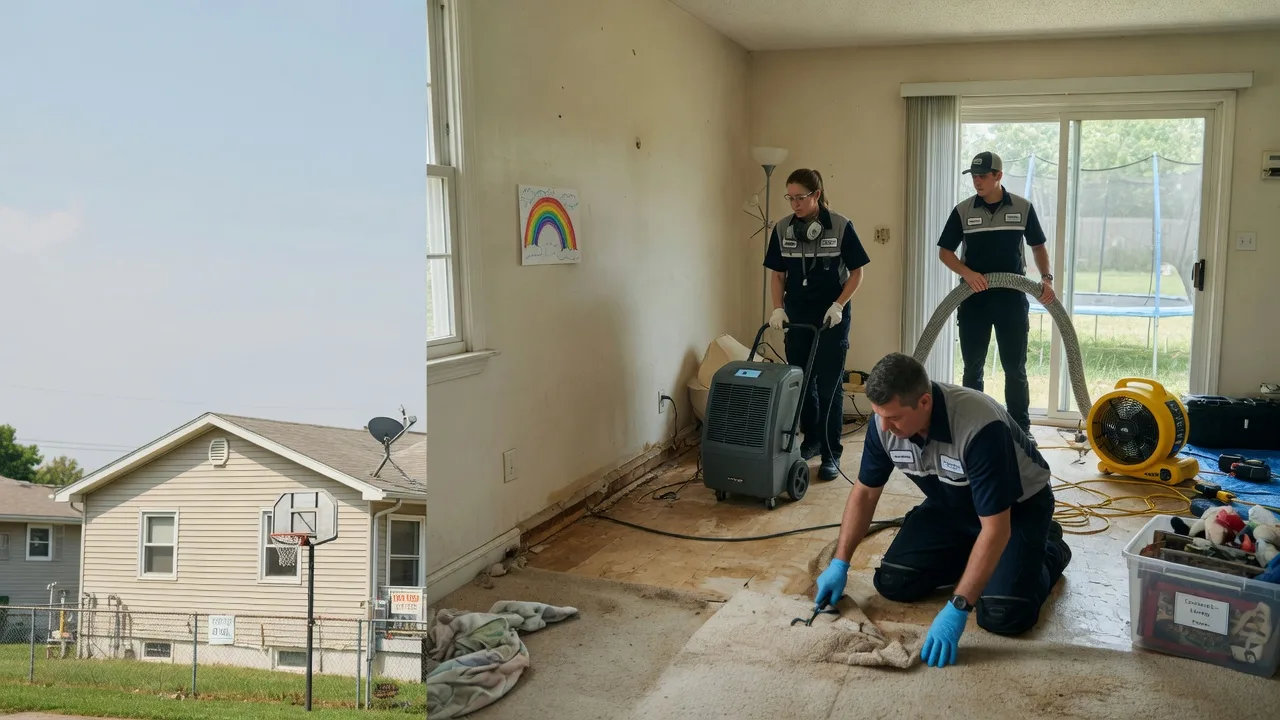
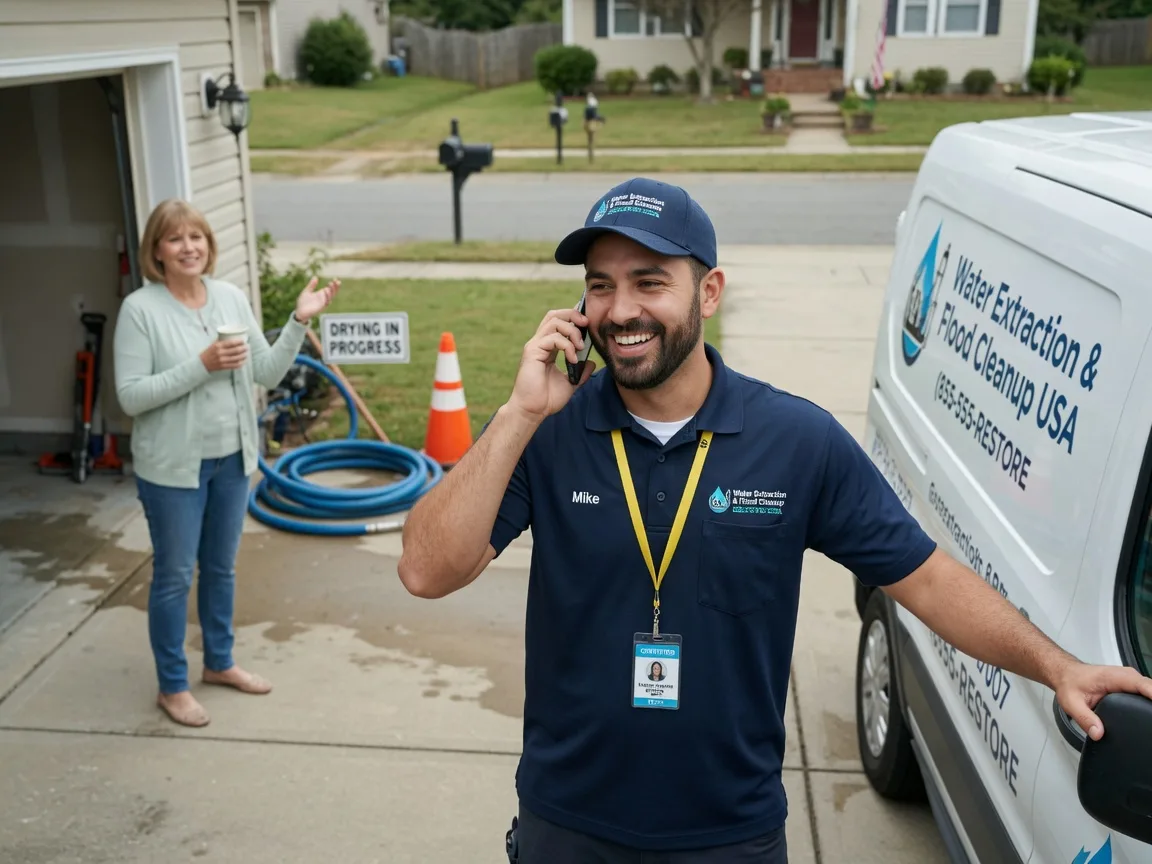
Basement Waterproofing Paint: How to Choose
If you have a damp basement, you are not alone. Many homes across the United States have the same problem. Damp basements can lead to rusting and ruining just about any item stored in this area of the house. If you are looking to solve this problem, a quality basement waterproofing paint may be just what you need.
Of course, if the process were as simple as slapping a coat of paint on a wall this problem would not exist. There are several steps to follow in a project to waterproof your basement. Depending on the problem you have, you may need to consult a professional waterproofer. This is especially true if you have water running through the walls and into a drain. However, the bulk of waterproofing can be accomplished by a homeowner just like yourself. If you want to rid the basement of that damp feeling and reduce the chance of being exposed to mold or mildew, you need to follow a few of the steps below. Sometimes trial and error are the best teachers.
First and foremost, you will need to rid the basement of existing humidity. Without taking the existing water out of the air the basement waterproofing paint will not dry properly. Many different types of dehumidifiers are available on the market. You should purchase one that meets the requirements of the size of your basement. There are also several humidity reducing chemicals and powders on the market, and some of these may be of use also. Primarily though, just running a dehumidifier can work wonders for a damp basement.
Secondly, you will need to remove any loose paint on the existing walls. Loose paint weakens the bonds of the new basement waterproofing paint. Be sure to use proper safety attire when removing paint. Safety glasses or goggles are a must, and a respirator or dust mask is highly recommended. Remember to protect yourself when doing any work around the house.
Thirdly, select a quality basement waterproofing paint. You should take care when selecting the product. Unless you are sure what type of paint you are painting over, if any, find a product that is compatible with latex and oil base paint. Mixing the types of paint over one another just leads to more problems. The staff of your local home improvement center or paint retailer can help you select a top notch basement waterproofing paint that matches your criteria.
The final step is application of the new product. Remember to apply the paint in neat generous layers. You may need two coats to get the basement entirely water tight. Also remember that if you leave the dehumidifier plugged in during the painting process, the paint will be prone to dry much quicker. Some paint makers recommend to leave the dehumidifier off during this process. Once your paint is dry, plug the dehumidifier back in and wait a few days, then unplug the unit. Most likely you are good to go, with a dry basement.
Basement Waterproofing Cost: How Much Will You Spend?
One of the worst things that can happen to a homeowner is the discovery of water in the basement of his house. Fortunately, there are ways that you can prevent such a disaster from happening. Depending on the source and cause of the water, these methods are not, however, cheap.
Condensation
About $280
If you notice excess condensation in your basement (on the walls or pipes) this water can drip onto materials and cause water damage. The simplest solution to this problem is to purchase a good quality dehumidifier. A decent, heavy duty dehumidifier typically costs about $250. In addition, you can insulate the pipes in your basement and ensure that all of the windows in your basement are closed and sealed during the winter to prevent cold air and rain from producing water on your walls and pipes. Cheap insulation and plastic sheets taped over the windows are the cheapest insulation solution, running at about $30.
Ground Water
$8 Per Crack or $11 Per Square Foot
A very costly problem in basements in ground water seeping through cracks in the floor or walls. If there is a visible crack in either, you may seal the crack with epoxy or caulk to prevent the problem from occurring. These materials typically cost around $8 per tube. One tube is normally enough to seal a crack. However, if there are no visible cracks or a large number of small ones, you may need to invest in a sump pump and interior drain. Do it yourself kits typically run at around $11 per square foot. Although this price can add up quite rapidly, professional installation would more than double the do it yourself cost.
Lawn Slope
Typically Around $100
Some lawns slope towards the foundation causing water to rush towards the house and seep through cracks in the basement. The major cause of this is flower beds or shrubs placed too closely to a house (less than one foot) These plants can reduce ventilation and cause moisture to build in the areas where they are planted. If slope is your problem, you can dig an irrigation ditch to draw water away form the house or install some simple underground pipes to allow ground water to flow into a nearby river or drain. Besides the time you spend digging and removing shrubs or flowers, this is arguably the cheapest solution to basement water problems. Plastic pipes from your local hardware store typically run at about $100, depending on how many you need.
Professional Waterproofing
Can Range From $2,000 to $12,000
If none of your home remedies work, you may need the assistance of a professional. Shop around before committing to a contract as waterproofing rates vary widely. Ask your neighbors is they used a service and what the results were. People that have used a contractor’s service will likely be more reliable sources than the company itself. Professional waterproofing should be your last result as the fee is normally anywhere from $2,000 to $12,000 depending on the problem and the contractor.
Basement Waterproofing Systems
If you have a home with a basement you will be interested in learning about the different methods for keeping it dry and waterproofed for the life of your home. A leaking, wet, or damp basement can cause mold and mildew to grow. There are three types of waterproofing to seal a basement from leaking. Tanking, cavity drainage system, and exterior foundation drain are the three customary means of waterproofing a basement.
Tanking is referring to the use of a bonding substance that when applied correctly adheres to the exterior walls of your basement. This treatment is best when applied during the construction phase of building. When Tanking is properly applied, it will keep the basement dry permanently. Unfortunately, in many cases a home’s basement does leak after the Tanking process is applied. If the Tanking does not hold, this will cause the need for another type of sealant or process to keep water and dampness out of the basement.
Another choice for waterproofing a basement is called a cavity drainage system. During construction a plastic membrane is installed on the basement floor and walls. The floors are deliberately sloped during construction, allowing water to drain into a sump pump that is installed. A cavity drainage is an electrically operated system. Any power outages and the system stops working because of the electric sump pump. Another disadvantage with this type of waterproofing is that after a period of time the membrane itself may mold and mildew. At this point the membrane will need to be removed and another waterproofing system applied.
An exterior foundation drain, or sometimes referred to as a French drain, is the third type of a basement waterproofing system. Some builders and homeowners prefer this system and rate it as the best waterproofing choice of the three. This system operates by using a ground drainage system. When installed correctly, the drainage pipes divert water away from the foundation and basement walls keeping the interior of the basement dry.
Basement leaks and dampness can cause serious damage to a house. A wet basement devalues your home and can turn a potential buyer away when trying to sell. Many do-it-yourself people can tackle a wet basement with great success. Most home improvement stores also offer seminars for information and step by step instructions for waterproofing a basement without hiring a private contractor. When making a choice about the best waterproofing basement system make the best decision by being informed.
Finding a Basement Waterproofing Contractor
Its every homeowner’s nightmare: Water is getting into the basement. Water incursion ruins carpeting, paneling, belongings store on the floor in boxes, plus you know its damaging the very foundation of your home. And everybody’s heard horror stories about unscrupulous waterproofing contractors charging ruinous amounts of money to stop the leaks. So how do you know when you’re being taken advantage of? How can you tell who the good waterproofing contractors are? While there are no sure-fire ways to guarantee you’re getting fair treatment, there are a few steps you can take to help yourself.
1. Call you city’s Public Works or Zoning Board and ask to speak to a building inspector. Explain your situations and your concerns. Many times a city’s building inspector knows the best companies to call to get the job done. Why? Because they are the ones who have to sign-off on the work they do, ensuring that it meets city zoning requirements.
This next step takes a few minutes walking around the outside of your house.
2. See if you can find out where the water is coming in. Look for exposed concrete or blocks at the point where the sides of the house meet the ground. The site of gray concrete of “cinder blocks” means that the soil has been washed away from the foundation and water is collecting in that low spot. You can be pretty sure you’ve found the source if the exposed foundation is in the same location as the water in your basement. Often times the fix is to simply add soil to fill-in where its missing. You also need to find out why the soil washed away so look for any obvious slope of the yard towards your house. It should slope away, carrying rainwater with it!
3. Inspect your gutters. Look at the horizontal edges of your roof, where the rain would drop off. Is there a gutter there? If so, is in it good condition and mounted flush against the house? Are the gutters clean from leaves or other debris that can cause gutters to overlfow? Also check the location of the downspouts and try to understand where the water goes when it rains. Downspouts should direct the water away from the house and, ideally, down the driveway to the street.
4. One of the most common sources for basement leaks is your front porch. The large concrete slab that many houses have as the surface of their front porch can separate from the house from normal settling. Normally there is a thin barrier installed between the house and porch to prevent water from seeping down. If the porch has separated, even a little, this barrier has been compromised and water can basically pour past the porch and into your foundation. This is quickly fixed by applying some waterproof concrete sealer to the gap between the porch and house.
So now that you have a better understanding of the hydrodynamic condition of your house, its time to call a contractor to take a look. The first rule is to call several contractors and schedule appointments for the same day to keep from being forced into an agreement. Many contractors use high-pressure sales tactics to get you to sign. Knowing there are other contractors coming makes it easier for you to say “not yet; I have other contractors coming.”
The next thing is to watch what they do. If the go into the basement and start talking about chiseling up the perimeter and installing drainage tiles, kindly thank them and ask them to leave. An honest contractor would walk the perimeter of your house with you, looking for the same things discussed earlier in this article.
When you find a contractor who understands why water is leaking into your house, and if he can explain it to you in simple terms without resorting to high-pressure sales techniques (”If you sign today I can throw in the dehumidifier rental”), be sure to ask him to double check that its not something simple before signing any contract.
How To Waterproof A Basement
If you live on the East Coast, maybe the West Coast, you are more likely to purchase a home with a basement. Basements are great for states or cities that are notorious for having fierce summer or winter weather. A basement is probably a lifesaver for homeowners living in the Midwestern part of the United States. Having a basement is indeed a lifesaver, but if a basement is not taken care of every year season, how can the basement take care of you?
Here are some ways a homeowner can preserve their very valuable basement for weather emergencies:
Fix holes and cracks: When a holes or cracks begin to appear in any of the basement walls or foundation, do not wait to patch them up ‘later’ or it will be too late. Any homeowner whose house has a basement should always check their basement on a regular basis for such imperfections because over time and through all kinds of weather, holes or cracks are very possible. If patching up any hole or crack is not something the homeowner likes to do, they can hire a contractor to come out and use the proper sealant to fix the unwelcome holes and or cracks.
Waterproof Walls: The walls of a basement are very important to maintaing it’s stability. In fact, if the walls are not stable, the whole house might fall down. This is why it is vital to waterproof the walls, inside and outside the basement. There are some waterproofing products that can be applied to the walls such as Xypex and Drylok. Now, waterproofing is not the same as sealing either. The way Xypex works, it is like applying a waterproofing concrete to the walls of a basement. The product Drylok is not a sealer, not a waterproofing product, but works nonetheless on minor leaks.
Clear out gutters and downspouts: Just like any home, it is necessary to clear out all the leaves or branches that might find their way into the gutters and downspouts around your home. The same goes for your basement. After clearing the gutters and downspouts, check to see that water comes out and away from your home at least 4-5 feet away. The less water around the foundation of your basement, the better.
Check for condensation: Because the basement is underground, it is more likely to have a build up of condensation. Condensation can easily gather moisture on the basement cold water pipes, walls and floors. The best way to reduce or remove all condensation is to use a dehumidifier or let sunlight into the affected area. If sunlight is not possible, purchase a space heater. The space heater should not be plugged in and used unless the homeowner is in the basement of course.
Basement Waterproofing Products
Basement waterproofing products will keep your basement dry, prevent mold and mildew and make your basement more usable.
Begin by diverting water away from your foundation with properly installed gutters and downspouts. This is the first step to a dry basement . Downspouts can be extended a short distance from the house for optimum water diversion.
Assess the condition of your basement. If the walls are painted and plant to apply a barrier sealant, the walls should be scraped and sanded. If there are large cracks in the floor or walls, these need to repaired. Fill thin cracks with a waterproofing mix. Clean out large holes and cracks in floors and walls and apply waterproofing mix.
Once the walls are properly prepared, several types of sealants can be applied. These sealants will create a barrier that keep moisture from seeping through the walls. They work best for dampness and seepage. If you have flooding in your basement, these products will need to be used in conjunction with drainage improvements.
Sealer paints are brushed onto the floor and walls of the basement. These products are easy to apply but follow label instructions carefully. Adequate ventilation is a must. A brush or paint roller can be used. Typically, these products are not sprayed.
For cement walls and floors, a good fiberglass-based sealant can be applied. It will fill small cracks and leaks and prevent further water penetration.
If your foundation is made of brick or stone, look for a product designed for these natural materials. Products for this specific application allow the stone to breathe while keeping excess moisture out.
Both of these types of sealants may need two applications for maximum effectiveness. They are usually water-based and can be thinned with water. Clean up is easy as well.
If larger amounts of water are entering your basement, you may need to improve drainage around your house. A french drain — a trench into which a drain pipe is laid — keeps water out of your basement by diverting it away from the foundation. These drains can become clogged with mud and silt over time, so they do require occasional maintenance.
A sump is a small reservoir under your basement that fills when the groundwater rises. A pump forces the water up and away from your house. Sump pumps are powered by electricity, so a batter back-up is recommended so that the pump will operate in a power failure. Sump pumps are often installed at the time of construction but they can be installed in an existing basement as well.
Severe basement flooding may require excavation, drainage improvements and the application of exterior barrier. A qualified contractor or basement waterproofing specialist can provide information on all of these options.
About Basement Waterproofing
Basement flooding is an issue for many homeowners. Doing an inspection of your basement along with the outside of your home will help pinpoint problems that will help in waterproofing your basement.
In evaluating the exterior of your house, keep gutters and downspouts clear.
Regularly check the drain pipes and remove debris, allowing free flow in your heating and air conditioning system and replace filters as needed.
Insulating your pipes will reduce condensation that can cause mold and corrosion.
Be sure to look over all ventilation systems, including exhaust fans, dryer vents and water heater and repair any malfunctions.
Sump pumps keep unwanted water out of your home. Check that the outlet pipe is not clogged or frozen and that it directs water away from your house. Test the pump by filling the sump pit with water to make sure the pump is working properly. Clean the air hole in the discharge line and verify the motor is running well.
Condensation on basement walls can be misconstrued for seepage because of hydrostatic pressure. In order to tell the difference between the two, tape a twelve-inch piece of aluminum foil to the wall that is inclined to moisture, sealing all sides tightly.
Check the foil in a couple of days to see if the side that was against the wall is wet. If this is so, then the problem you are looking at is seepage. If it is the outside that is wet, then it is condensation., which a dehumidifier can help solve.
Keep in mind that not all water-repellent and waterproofing coatings are the same even if the company advertises as such. Water-repellant means it is to be used for the exterior in above-ground concrete or masonry. Since it only briefly repels water it is not meant to block the passage of wetness under hydrostatic pressure. Some repellants fill surface pores to avert moisture movement and others are film-forming.
Waterproofing coatings stops the access of water to the basement under hydrostatic pressure. These film-forming coatings are actually suited for above and below as well as for interior and exterior usage. Even the finest waterproofing coating might not put an end to dampness if the block walls are not in good condition. Sweep the area clean, remove dirt and grime and then do a final wipe down of the area. Use a wire-brush to remove old paint and use a quick-dry cement to patch cracks. When doing this don’t forget to include the joints where the wall and floor meet.
Follow instructions carefully making sure to use the spread rate that is required. Work the coating into the pores during the application. In some cases a second coating may be required.